Showing posts with label Terrain. Show all posts

Tuesday, February 28, 2023

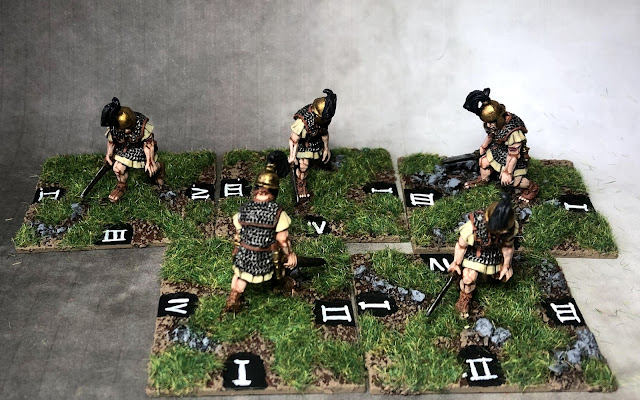
Caesarian casualties

 Caesarian casualties terrain

Another paint job last week for the analogue painting challenge, the final casualty markers for my Caesarian army. I plan to use these for both legions that I am building and may add shields to the standing chaps. The miniatures are from the Warlord Miniatures range. 


cheers
Matt

Tuesday, February 14, 2023

Terrain Tuesday - markers and mini Diorama

 First one for the year some table additions buildings and mini dioramas for scatter 

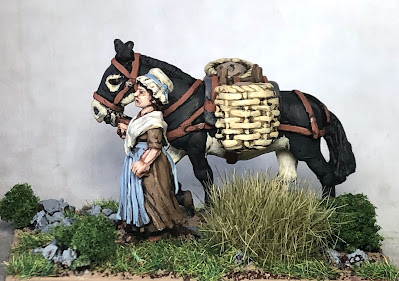
a foundry lady with a Mirliton donkey, love this!


Tankard turn marker, a gift from Philippe for Christmas, a nice resin piece made by a member of our club. 


Foundry medieval casualty markers


cheers
Matt


Tuesday, October 25, 2022

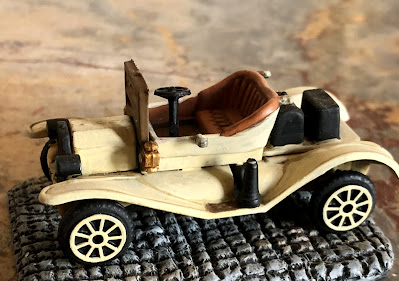
Terrain Tuesday - Civilian car

  Terrain Tuesday returns

Since I now have some evenings to return to painting minis I thought it was a good idea to kick off my terrain Tuesdays again (as my 3d filament printer has been going most of summer and autumn! )

 I like to add civilian pieces to my tables and often will have a look in the charity shops for suitable pieces, this is late 20s early 1930s car for my ww2 or SCW table. I am thinking of adding luggage etc as though it is a refugee vehicle, but may just leave it to park next to terrain. This piece has been on my painting table for some time so I thought I would just complete it today. Quite happy with the results. 


Cheers
Matt


Tuesday, November 16, 2021

Gladiators Dust and Shadows Terrain Tuesday Arena build part two

 Gladiator Arena 

Terrain Tuesday 

Commenced work on my Gladiator arena tonight, as part of terran Tuesday builds. First I cut out a 600x 600 plywood tile, cut my supporting sides sides, then glued and stapled into place. 

My standard terrain boards are 600 x 600

I then worked out my arena size so I could duplicate it at the other end, plus a central piece can be added for chariot racing, and that way it will fit on my table neatly at one end for chariot games. 

Ruler as compass

I then drilled points into a plastic ruler, one end in screwed into a central point and the other points are worked out to make the circles which increase at 2cm steps . 


The Arena Base 40 x 45 oblong


Lower arena, sand will be used to level out the ground 

Upper arean piece, this will form the walls


I moved the edge in so I could add shops against the wall

The stairs and seating is laid out

Glueing and setting overnight on the first two levels 

I plan to add cardboard to the interior walls and steps , then the exterior walls, place rendered  decoration and possibly graffiti and some market stalls. Until next week!

cheers
Matt

Tuesday, November 9, 2021

Gladiators Dust and Shadows Part one


We are but Dust & Shadows

Terrain Tuesday Gladiator Arena thoughts

Model at the Museum of Jublains


While I was suffering painters block a few weeks back I turned to movies, books and local adventures to put me back on course. All of the options however added some more kit to my painting and construction tables, and some ideas were moved to the front rather than at the back, moj is back happy to say and going through a purple patch now!

On one of the tours we visited our local Amphitheatre at Jublains, the former Roman capital of the Diablintes tribe about 10 klms away from the Maison. This gave me inspiration for two things. One was the Gallic farm buildings (see previous post) and the other was gladiators.

I am yet to build the amphitheatre, however I want it to be around two x two foot tile, oval which will look a little different, with a removable rear wall so I can remove it then also add a straight section and second corner for chariot racing on the big table.

The arena tile will then also fit on my chess table for extra transportable use around the house.
I have six gladiators already completed for around 10 years or so, but also had a lot unpainted gladiators, animals and chariots, so this week I added another 20 odd to the table front and centre, and most will be off the table this week over the coming days while the blood is up!


I am yet to find a suitable set of rules which would be good for French Wargame Holiday evening games, looking at Steve Barbers gladiators set and possibly the old board game set, any other suggestions ?


Jublains Amphitheatre 1st Century AD


Artists Impression of Jublains Arena I will build something like this with removable wall


Cheers
Matt

Friday, November 5, 2021

Oh la Vache (holy cow!)

 Oh la Vache! 

One of my more favourite local French curses! After almost three weeks of low motivation I am back at it, completed a lot of all jobs and two large projects over the last two days.

First up cows, I know however I do use them in a few games here at French Wargame Holidays and I now have a modest herd of 12 beasts, which will serve well my purposes plus can be used as table clutter for bigger games. Miniatures are from First Corps range but I cut off the neck hump which is more of a southern thing on cattle. 


Cheers
Matt

Tuesday, November 2, 2021

Terrain Tuesday Gallic Village and buildings Part 1


Gallic buildings

My next terrain project is to get back to building some ancient terrain, first thing to complete is some Gallic buildings that can be stand alone or part of my hill fort build.


Inspiration will be taken from our local museum and the archeological report from Moulay Gallic fortress, the oppidum / hill fort is about 5klm from our house.


When wargamers build typical Gallic building they predominantly build round ones, looking at the archeological report on the 60HA site at Moulay only 10% were round and mostly animal shelters, workshops or storage. The majority are rectangular and some are quite big and include a theatre /council amphitheatre in Greek style, and a shrine.

I plan to build a number of buildings for residential, central buildings theatre and shrine and maybe a workshops area and some farms on the exterior of the Gallic Oppidum fortress. 


typical Gallic buildings


artist impression of the workshops


Gaulois building typical at Moulay 53BC


Gaulois building typical at Moulay 53BC


Theatre

one of the buildings was a theatre or perhaps a parliament council, or sale yard, I want to add this model to my village.


Gallic Farms

Gallic Farm steas with it own boundary ditch and walls, these are all along the roads leading into the village along the route of the modern motorway


Gallic farm model


Gallic Head Hunter Shrine

Moualy does have a shrine but no evidence of a head hunter shrine as the current church is built over the site, the Diablintes and Cenomani may of taken heads so I will add one I think.


Gallic head hunter shrine near Tours


Stone pillars the heads were placed in the hollowed out pieces

Excited to get cracking on these!

cheers
Matt


Wednesday, September 8, 2021

Terrain Tuesday Tree Renovations - Part 11 Bigger is Better


Bigger is Better when it comes to Trees

As my collection is predominantly 28mm (4500 odd painted figures) I have decided to up my anti and build 28mm scale trees particularly for my Gaulois collection and dark age/early medieval before the fields really started to be tended locally, plus really good for my larger forest stands. These trees are made using my usual practice of oven dried hedge clippings then rubberised horse hair and then woodland scenics powdered flock, basing products, and a large washer on a 50mm base so it fits the magnetic tree base.


If you look at part ten you will of seen a tutorial my method of construction step by step Here


Very happy with the first six, now I need some more flock !


28mm Trees


The Bigger trees are from 18-26cm tall, with magnetic bases to go into the forest bases.


Cheers
Matt

Tuesday, August 3, 2021

Tree Renovations Part 10 Tree Tutorial

 Terrain Tuesday Trees Part 10


Making a wargames tree......

On Sunday I decided to finish off some more trees for the 20mm terrain. You can never have enough trees and I like to have a lot of them in various sizes and colours. I have been making trees for 30 odd years, wire armatures, sticks and commercial boxed ones. I can remember making some when I was around 15 years old using tree sticks and moss from a Stan Catchpol modelling workshop, military modelling article.  Since then I have made several hundred, particularly when I run the Goulburn Valant Stormers Wargames Club, but when I departed Australia I parted with my real timber ones, so upon arrival in France I needed to replace all of them except the evergreens. I prefer to buy my evergreens mostly from model railway companies and make my deciduous trees.

My preference for trunks is hedge cuttings as they already have the branches. Last year I cut down a box hedge in the garden so now have a lifetime supply of branches, which were oven baked then put in boxes awaiting use, classified into 20mm (up to 20cm high) and 28mm (up to 50cm high)

How too


Step 1.
I simply select a number of suitable hedge branches from the stockpile.

Step 2 
Using a hole saw I cut from 3mm MDF 40-50-75mm bases depending upon tree size.


Step 3 
I attach with hot glue, sometimes I also add a tack on large trees, plus make a base and roots too from green stuff.


Step 4
With a 60/40 mix of PVA I paint the base then sprinkle with my builders sand mix, I grade my builders sand into rough and light, I use my rough mix as I get as a bonus rocks and bts on the base. 


Step 5
I paint the base dark earth brown, then dry brush with a tan colour to match our soil here in southern Normandy/Pays de Loire, paint the stones then ink and drybrush. 


Step 6
I tear up the rubberised horsehair into clumps spreading it out into the canopy shape, then attach the rubberised horsehair with hot glue. I buy my rubberised horsehair from upholstery suppliers in the UK.


Step 7  
Select Flock colour, some people make theirs but I have never bothered, I use woodland scenics or NOCH, Faller products.  I use light green, middle green, dark green or even orange-brown (for Autumn) sponge fine flock. I use a deep plastic box for the flock so I can shake off excess and catch it all.


Step 8
I then using latex or washing up gloves I cover the base, placing the tree trunk  between my fingers. Then I use a hobby spray adhesive (from a $2 shop) on the rubberised hair, coating it liberally. The Selected Flock colour is poured into a box, then sprinkle my selected colour, let set, then a second application.


Step 9
I then may add a sprinkle of mixed leaves or colour (white, red and yellow for plane trees, fruit trees in blossom). 

Step 10
I then Varnish the tree with gloss varnish.


Step 11
Clean up and neaten up with scissors, some can have a few character pieces you can leave or cut off. 

Step 12
Add flock, bushes and flowers to the base. 


Simples, ok several hours work over the least three days. I tend to do batches of twenty odd trees at a time.

I still have another 50 plus odd to go but I have run out of middle green woodland scenics as I completed some new 20mm bocage for the ww2 Normandy table as well, but waiting on more flock........For some variation of my 28mm trees I am about to commence my first sea moss trees so wish me luck!

cheers
Matt

Sunday, July 18, 2021

Dark Age markers

 Last week was hectic with Vanessa’s birthday, renovation of a timber floor and guests from Holland and France,  plus another birthday party so not a lot of time to complete much at all. I did get some time on the bench for terrain and a complete the basing of a few units. Today as a rest day I completed a few plastic kits that remained from my 30 day kit challenge.

This week I should complete another two units for my Breton independence wars and some more work on my ongoing Napoleonic projects, Baden, French and Prussians. Later in the week some more ww2 and medieval are also lined up in the queue as the weather has improved perfect for the airbrush! 

These markers were simple and have been sitting in my to do’s pile for some time, the shields have been completed for a long time, all transfers except for the Norman kite shield. I just needed to sand the bases paint and glue them on. More dark ages coming as I have started assembling my Victrix Vikings …..perhaps next month. 


Dark Age Disorder Markers


Cheers
Matt

Tuesday, July 6, 2021

Modern Civilian cars and Technicals


Technicals and Civilian vehicles

On facebook last month someone posted a T55 turret mounted on a dump truck, so off to our local charity shop this weekend see if I could pick up a suitable piece, while I was there I also picked up some other pieces, some for my Bundesgrenzschutz build and some other pieces, I like lots of cars for terrain fillers for modern warfare, it makes the terrain look lived in.


While I failed in my task to find a suitable dump truck I did manage to pick up a number of civilian 80s cars, a big bonus plus some suitable ww2 cars! As with most matchbox, majorette vehicles of the 80s lots of sports cars and not many everyday cars suitable for the wargames table. All of these will be receiving a new paint job at some stage and join my box of terrain filler bits!

Porsche 924 My dream car in 1985 before I knew about V8s....


BMW 733, my uncle had one of these in about 87

Mercedes 350SL two door.....so sexy

Citroen SM I was excited to find this!

James Bond my feature in his swimming lotus esprit!


A caravan, the second one, I think it will join a lakeside camp perhaps

Mercedes Benz 2400, It will join my Bundesgrenzschutz


Next week another visit and see If I can get lucky

cheers
Matt