Monday, August 9, 2021

JU86 D1 project part 1


Junkers JU86 D1 build


Well a cold wet day kept me from doing external chores so I elected to pull out some kits from the stock and decided upon the Italeri Junkers JU86D1 and four others to assemble over the coming week of predicted wet weather.

 Originally I purchased this for SCW aerial dogfights, but as it is a little large I have decided to add it to my Luftwaffe for the invasion of Poland where I believe the JU86D1 flew its only combat missions of ww2 with Kampfgeschwader 1 /III, (I do quite like the 5th Staffel KG254 1937 colours below).

I will paint in the early war pattern I think, and as a wargaming flying model, as very little information exists for the JU86D1 service. 

JU 86 colour ideas

JU86 colour ideas


cockpit Interior 
looking at the forward bombardier/gunners position


The  dorsal gunners position; and within a retractable ventral position


Interior commenced RLM 02 brush painted


cheers
Matt

Leopard 1 Bundeswehr Cold War


Leo 1 Diecasts

So Clive (at Clives Diecast and kits) had some Leo 1s on sale recently and I could not resist picking up a few more to add to my Bundeswehr Kampfgruppe. My second battalion of Leopard 1 tanks is now completed for my cold war Bundeswehr army. A few more pieces to add like mobile artillery and another Gepard AA and the Kampfgruppe will be completed for Able Archer (Rapid Fire modern rules). 

A repaint coming up in the workshop over the next two months, some stowage, cam nets and some crew added is on the cards too!


cheers
Matt

Saturday, August 7, 2021

50th Infantry Division Tyne Tees Part 2


 50th Infantry Division


This years big ww2 project is the 50th Infantry Division for D-Day to Holland. I have chosen my favourite 20mm figs for my Brits from my stash of Britannia miniatures. Painting has commenced and is more than halfway complete of the infantry figures after three days.

I will break this into the 69th division first, plus support elements, then perhaps another infantry Division later on. Rapid Fire rules so Battalions are around 40 figures.

69th Infantry Brigade

 69th Infantry Brigade 
  • 5th Battalion, East Yorkshire Regiment
still in progress
  • 6th Battalion, Green Howards 
    • red flash behind cap badge
completed
  • 7th Battalion, Green Howards

completed 


1st Assault Brigade Royal Engineers (D-Day)
6th Assault Regiment, Royal Engineers

81 SQN 

Churchill AVRE fascine Built not painted
Churchill Avre Bobbin Built not painted
Churchill bridgelayer Built not painted

Royal Armoured Corps (D-Day)
Westminster Dragoons
HQ 
dingo built
M14 AA (not Purchased)
2 x trucks complete
M32 Sherman Armoured Recovery Vehicle (not built)

A sqn 2 x sherman crab flail tanks (not built)
C sqn 2 x sherman crab flail tanks  (not built)

141st Royal Tank Regiment (all of the regiments churchills names began with S)
I will model 
C Squadron commanded by lt Shearman 13 troop small turret number 13
Three crocodiles from 13 Troop landed at La Riviere where one floundered in a deep underwater crater and the other two crocodiles were able to get ashore.

1 x churchill crocodiles ("Sandgate" T173174H commanded by lt John Shearman MC) Built not painted
1 x Churchill crocodile ("Sandling "T173174  commanded by Sgt Reg Webb) (not purchased)

The two crocodiles supported the 7th Green Howards (69th Brigade, 50th Infantry Division) assault on the La Marefontaine gun battery (WN32) which contained four Czech 100mm guns located in fields outside the hamlet of La Marefontaine south of Ver-Sur-Mer.

Royal Marines (D-Day)
1st Royal Marine Armoured Support Regiment

A troop

1 x centaur


No. 47 (Royal Marine) Commando

HQ coy (partial complete)

4 companies (partial complete)


Royal Artillery

74th (Northumbrian) Field Regiment

296th (4th) Durham

298th (1st) Durham

102nd (Northumberland Hussars) Anti-Tank Regiment

99th battery
2 6pdrs Guns and bren carrier
1 M10

288th battery
2 x 6pdrs and bren carriers
1 M10

198th battery (attached from 73rd AT regiment)
2 x M10

234th battery (attached from 73rd AT regiment)
2 x M10


25th Light Anti-Aircraft Regiment

Polston AA 20mm gun and tow

1 x crusader AA

82nd LAA battery

Bofors AA battery


Next years project will be the DLI

151st Infantry Brigade 
6th Battalion, Durham Light Infantry
8th Battalion, Durham Light Infantry
9th Battalion, Durham Light Infantry (left 30 November 1944, joined 131st Brigade, 7th Armoured Division)

Corps Elements 

61st Reconnaissance Regiment, Reconnaissance Corps

plus assorted trucks, medical and bits


cheers

Matt


Wednesday, August 4, 2021

Gendarmes d'élite de la Garde Impériale

Gendarmes d'élite de la Garde Impériale

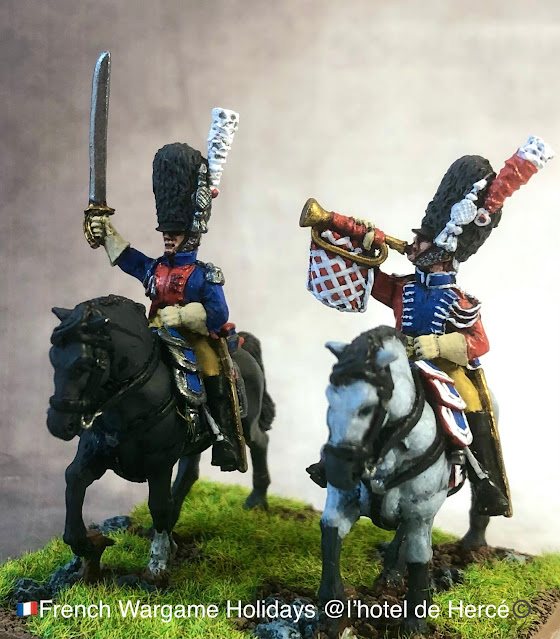
I have had this unit for two years sitting in the to paint pile, this year I have decided to do some more pieces for my French Napoleonic Armies so last month I started and completed these chaps and then ordered the flag from GMB, I finally mounted the flag yesterday and manage to take some photos this morning. 

The figures are from Gringo 40s, who also do a very fine range of other guard units, the figures are on the larger side for 28mm but fit my Elite 1805-09 army nicely. Really happy with my paint job and I hope to get the big boots on the table soon. 

28mm Gendarmes d'élite de la Garde Impériale

Gendarmes d'élite de la Garde Impériale Trumpeter


Gendarmes d'élite de la Garde Impériale kettledrummer


cheers
Matt

Russian Motorised troops


 Russian Motorised Troops 

I have started to refocus to complete a number of my projects for 2021 and my Russian motorised troops are next on the list for completion. I am using Elhiem miniatures Russians to fill out my recon and motorised battalions in camouflage suits. I will probably pick up a second battalion in the coming months to bring them up to a regimental combat group. I am following my previous recipe for the for camouflage. Vallejo Green with dark sand splotches, washed then highlighted in same with a hint of bleached bone. 


cheers
Matt 


Tuesday, August 3, 2021

Tree Renovations Part 10 Tree Tutorial

 Terrain Tuesday Trees Part 10


Making a wargames tree......

On Sunday I decided to finish off some more trees for the 20mm terrain. You can never have enough trees and I like to have a lot of them in various sizes and colours. I have been making trees for 30 odd years, wire armatures, sticks and commercial boxed ones. I can remember making some when I was around 15 years old using tree sticks and moss from a Stan Catchpol modelling workshop, military modelling article.  Since then I have made several hundred, particularly when I run the Goulburn Valant Stormers Wargames Club, but when I departed Australia I parted with my real timber ones, so upon arrival in France I needed to replace all of them except the evergreens. I prefer to buy my evergreens mostly from model railway companies and make my deciduous trees.

My preference for trunks is hedge cuttings as they already have the branches. Last year I cut down a box hedge in the garden so now have a lifetime supply of branches, which were oven baked then put in boxes awaiting use, classified into 20mm (up to 20cm high) and 28mm (up to 50cm high)

How too


Step 1.
I simply select a number of suitable hedge branches from the stockpile.

Step 2 
Using a hole saw I cut from 3mm MDF 40-50-75mm bases depending upon tree size.


Step 3 
I attach with hot glue, sometimes I also add a tack on large trees, plus make a base and roots too from green stuff.


Step 4
With a 60/40 mix of PVA I paint the base then sprinkle with my builders sand mix, I grade my builders sand into rough and light, I use my rough mix as I get as a bonus rocks and bts on the base. 


Step 5
I paint the base dark earth brown, then dry brush with a tan colour to match our soil here in southern Normandy/Pays de Loire, paint the stones then ink and drybrush. 


Step 6
I tear up the rubberised horsehair into clumps spreading it out into the canopy shape, then attach the rubberised horsehair with hot glue. I buy my rubberised horsehair from upholstery suppliers in the UK.


Step 7  
Select Flock colour, some people make theirs but I have never bothered, I use woodland scenics or NOCH, Faller products.  I use light green, middle green, dark green or even orange-brown (for Autumn) sponge fine flock. I use a deep plastic box for the flock so I can shake off excess and catch it all.


Step 8
I then using latex or washing up gloves I cover the base, placing the tree trunk  between my fingers. Then I use a hobby spray adhesive (from a $2 shop) on the rubberised hair, coating it liberally. The Selected Flock colour is poured into a box, then sprinkle my selected colour, let set, then a second application.


Step 9
I then may add a sprinkle of mixed leaves or colour (white, red and yellow for plane trees, fruit trees in blossom). 

Step 10
I then Varnish the tree with gloss varnish.


Step 11
Clean up and neaten up with scissors, some can have a few character pieces you can leave or cut off. 

Step 12
Add flock, bushes and flowers to the base. 


Simples, ok several hours work over the least three days. I tend to do batches of twenty odd trees at a time.

I still have another 50 plus odd to go but I have run out of middle green woodland scenics as I completed some new 20mm bocage for the ww2 Normandy table as well, but waiting on more flock........For some variation of my 28mm trees I am about to commence my first sea moss trees so wish me luck!

cheers
Matt